Tuesday, October 30, 2012

Sexy in Red


This tutorial was written for those who have a working knowledge of psp.
I use paint shop 9, but any version should work.
All of my tutorials are of my own creations any similarity with any other tutorial is purely coincidental.Please do not copy my tutorials please link back to my blog!


I am always interested in seeing what you create using my tuts. You can send your results to me at lynnkitten101@gmail.com.


SUPPLIES NEEDED


Tube of choice.
I am using artwork  by Akkasshaa. A PTU Artist. You must purchase and obtain a license to use.  You can purchase this tube at SATC HERE.

Scrapkit PTU Sexy Red by Schnegge.  
You can purchase this kit at SATC HERE.

 Mask of choice. I used mask317 by WSL, which you can get HERE


Font of choice. Albemarle Swash 
Filters needed: 
eye candy4-gradient glow-not required used for name

Don't forget to save often.


Instructions for coping and pasting. 

Activate the layer. 
Selections-select all-float-defloat-selections-invert, active paper or tube layer and hit delete. 

When you see C/P in the tut that means Copy and Paste.
Add drop shadow as desired. See my tag for exact placement.

LET'S GET STARTED


C/P Frame01, using your magic wand click inside of the the frame, selections, modify by5, c/p paper15. Selections, invert, hit delete. C/P tube, duplicate tube, close the duplicate and click on the original, hit delete. Select none, move under your frame layer. Click on duplicate tube, open it and send to top, erase part of the tube you don't want showing outside of the frame.


C/P elements of choice or use mine below. See my tag for exact placement.

bow4 resize45% place at the top on the left side 

bow01 resize45% place on top of bow4

champagne resize50% place at the bottom on the right side

champagne glass resize50% place at the bottom on the right side

pumps resize30% place at the bottom on the right side

boxes resize50% place at the bottom on the left side

cushion resize60% place at the bottom on the left side

Crop merged opaque.

Add a new raster layer floodfill with black send to bottom and apply mask, merge group.

Merge visible. Re-size to desired size. 

Add name or saying of choice. 

Add proper copyright info and save as .png
Thanks for trying my tutorial. I hope you enjoyed it.

This tutorial was written on October 30, 2012


Keep Out


Tube of choice.
I am using artwork  by Arthur Crowe. A PTU Artist. You must purchase and obtain a license to use.  You can purchase this tube here.

Scrapkit PTU DemonNight by Inzpired Creationz.  
You can purchase this kit here.

 Mask WSL56 which can be found HERE


Font of choice. I used Impact and Eye Candy4-Drip
Filters needed: 

eye candy4-drip and gradient glow-not required used for name

Don't forget to save often.

LET'S GET STARTED

Open a new image 700x700. 

Instructions for coping and pasting. 

Activate the layer. 
Selections-select all-float-defloat-selections-invert, active paper or tube layer and hit delete. 

When you see C/P in the tut that means Copy and Paste.
Add drop shadow as desired. See my tag for exact placement.


C/P elements of choice or use mine below. See my tag for exact placement.

stairs resize75% place in the middle  

door resize85% place at the top of the stairs

c/p your tube place on the bottom step 

grass2 resize75% place at the bottom on the right side, send to bottom, duplicate and mirror, move them so they cover the bottom of the tag

click on top layer

grass1 resize75% place at the bottom on the left side

sign3 resize50% place on the left side move under the stairs layer in the layers palette

click on top layer

handprint resize20% place on the sign

tree2 place on the left side, send to bottom, duplicate, mirror

click on top layer

web4 resize50% place in the tree on the left, arrange under your tube layer in your layers palette

headstone3 resize50% place towards the bottom on the right side

blood splatter2 resize30% place on the headstone

creepy hand resize30% place in front of the headstone

wordart1 resize50% place at the bottom on the right side in front of the creepy hand

moon resize50% place on the right side at the top send to bottom

merge visible, resize 90%

c/p paper3 apply mask, merge group, send to bottom

Crop merged opaque.

Merge visible. Re-size to desired size. 

Add name or saying of choice. 

Add proper copyright info and save as .png
Thanks for trying my tutorial. I hope you enjoyed it.

This tutorial was written on October 29, 2012


Monday, October 29, 2012

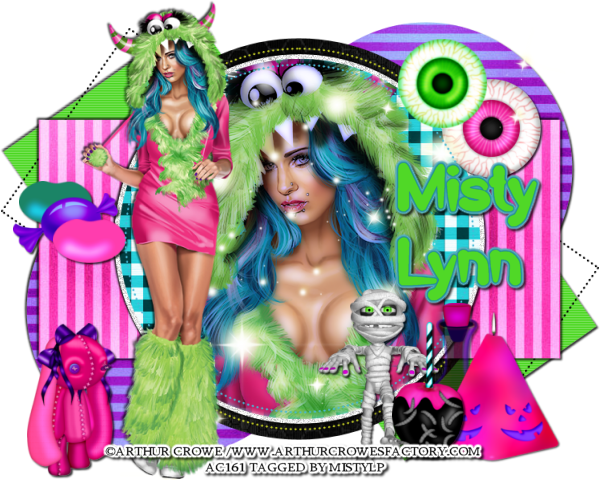
Monster Madness


This tutorial was written for those who have a working knowledge of psp.
I use paint shop 9, but any version should work.
All of my tutorials are of my own creations any similarity with any other tutorial is purely coincidental.Please do not copy my tutorials please link back to my blog!


I am always interested in seeing what you create using my tuts. You can send your results to me at lynnkitten101@gmail.com.


SUPPLIES NEEDED


Tube of choice.
I am using artwork  by Arthur Crowe. A PTU Artist. You must purchase and obtain a license to use.  You can purchase this tube here.

Scrapkit PTU Monsterland by Bibi's Collection.  
You can purchase this kit here.

Template7 by ToxicDesirez. You can get it HERE 


Font of choice. 2Peas Scrumptious HERE
Filters needed: 
eye candy4-gradient glow-not required used for name

Don't forget to save often.

LET'S GET STARTED

Open template, shiftD close the original. Delete Credits, Pixel Words, words, and background. 

Instructions for coping and pasting. 

Activate the layer. 
Selections-select all-float-defloat-selections-invert, active paper or tube layer and hit delete. 

When you see C/P in the tut that means Copy and Paste.
Add drop shadow as desired. See my tag for exact placement.

Copy and paste desired papers into each layer.  Then delete the original layers. Only add a drop shadow to the frame layers for the template.

I used paper11  resize20% for circle2, c/p close up of tube, I added xero-porcelain twice  

Paper1 for circle1

Paper10 for circle right and circle left

Paper9 for rectangle

For left square and right square add a new raster layer and floodfill with color  #42d616. Effect-texture effects-blinds. Width 3-Opacity 33-white-horizontal/light from left-top checked

For glitter circle add a new raster layer, floodfill with white. Add noise-uniform-80%


C/P tube of choice place on the left of the template. Duplicate, on top layer adjust blur, guassian blur3, change the blend mode to soft light in the layers palette. Add drop shadow to bottom layer. Merge down.

C/P elements of choice or use mine below. See my tag for exact placement.

element54 resize60% place on the right side at the bottom

element14 resize60% place at the bottom on the right side to the left of the candle(ele54)

element47 resize75% place on the right side at the bottom between the candle(ele54) and candy apple(ele14), move under both layers in the layers palette

element30 place on the right side towards the top

element88 resize50% place at the bottom on the right side to the left of the candy apple(ele14)

element71 place on the right side below element30

element50 resize80% place on the left side towards the middle

element43 resize80% place on the left side below element50

element46 resize80% place on the left side belowe element43

element86 resize60% place at the bottom on the left side

element64

Crop merged opaque.

Merge visible. Re-size to desired size. 

Add name or saying of choice. 

Add proper copyright info and save as .png
Thanks for trying my tutorial. I hope you enjoyed it.

This tutorial was written on October 26, 2012


Thursday, October 25, 2012

Lady of the Night


This tutorial was written for those who have a working knowledge of psp.
I use paint shop 9, but any version should work.
All of my tutorials are of my own creations any similarity with any other tutorial is purely coincidental.Please do not copy my tutorials please link back to my blog!


I am always interested in seeing what you create using my tuts. You can send your results to me at lynnkitten101@gmail.com.


SUPPLIES NEEDED

Tube of choice.
I am using artwork  by Ismael Rac. A PTU Artist. You must purchase and obtain a license to use.  You can purchase this tube here.

Scrapkit PTU Demoniac by PinkCandy Designz.  
You can purchase this kit here.

Template153 by ToxicDesirez. You can get it HERE 


Font of choice. 2Peas Scrumptious
Filters needed: 
eye candy4-gradient glow-not required used for name

Don't forget to save often.

LET'S GET STARTED

Open template, shiftD close the original. Delete Credits, stars, words, and background. 

Instructions for coping and pasting. 

Activate the layer. 
Selections-select all-float-defloat-selections-invert, active paper or tube layer and hit delete. 

When you see C/P in the tut that means Copy and Paste.
Add drop shadow as desired. See my tag for exact placement.

Copy and paste desired papers into each layer.  Then delete the original layers. Only add a drop shadow to the frame layers for the template.

I used paper3  for rectangle right and rectangle left. 

Paper11 for oval.

For Rectangle c/p close up of tube paste on the right side, hit delete. Select none, duplicate and mirror. Change the blend mode of one to luminance(l) and the other to 40% opacity 


C/P tube of choice place in middle of template. Duplicate, on top layer adjust blur, guassian blur3, change the blend mode to soft light in the layers palette. Add drop shadow to bottom layer. Merge down.

C/P elements of choice or use mine below. See my tag for exact placement.

Lips resize30% place on the left side at the top

Bat resize45% place at the top on the right side

Eye resize30% place on the right side at the top

Heart resize30%  place at the top on the right side

Web resize90% place in the middle of the template arrange under your tube layer in your layers palette

Skull candle resize45% place on the left side of the template above the web layer in your layers palette

Coffin resize75% place at the bottom on the left side

Candle resize55% place on the left side at the top of the coffin, like it is resting on it 

Bush resize75% place at thebottom on the right side move under the coffin layer in your layers palette

Skull2 resize35% place on the right side at the bottom to the right of the coffin, be sure it is above the coffin layer and the bush layer in your layers palette

Cat resize35% mirror, place at the bottom on the right side to the right of the skull 

Crop merged opaque.

Merge visible. Re-size to desired size. 

Add name or saying of choice. 

Add proper copyright info and save as .png
Thanks for trying my tutorial. I hope you enjoyed it.

This tutorial was written on October 25, 2012


Tuesday, October 23, 2012

Enchanted Halloween


THIS TUTORIAL IS WRITTEN FOR THOSE WHO HAVE A WORKING KNOWLEDGE OF PSP.

I USE PSP9, BUT ANY VERSION SHOULD WORK.

ALL OF MY TUTORIALS ARE OF MY OWN CREATIONS. ANY SIMILARITY WITH ANY OTHER TUTORIALS IS PURELY COINCIDENTAL.
I AM ALWAYS INTERESTED IN WHAT YOU MAKE USING MY TUTORIALS, YOU MAY SEND YOUR RESULTS TO ME AT MISTYLYNN1009@AOL.COM AND I WILL SHOW THEM OFF.

SUPPLIES NEEDED:TUBE OF CHOICE.
I AM USING ARTWORK BY ALEX PRIHODKO. A PTU ARTIST YOU MUST PURCHASE AND OBTAIN A LICENSE TO USE. WHICH YOU CAN GET HERE

SCRAPKIT OF CHOICE.
I AM USING A PTU KIT BY BIBI'S COLLECTION CALLED ENCHANTED WHICH YOU CAN GET HERE


DON'T FORGET TO SAVE OFTEN!

WHEN YOU SEE C/P THAT MEANS COPY AND PASTE

INSTRUCTIONS FOR COPING AND PASTING
ACTIVATE THE LAYER, SELECTIONS-SELECT ALL-SELECTIONS-FLOAT-SELECTIONS-DEFLOAT, CLICK ON THE ITEM YOU WANT TO PASTE, COPY IT BACK TO WHERE ARE WORKING AND PASTE. SELECTIONS-INVERT AND HIT DELETE. SELECT NONE. THAT IS USED MAINLY FOR COPYING PAPERS AND TUBES INTO FRAMES. OTHER WISE YOU JUST COPY AND PASTE.


LETS GET STARTED!!
OPEN A NEW IMAGE 600X600

C/P ELEMENT2, RESIZE85%, USING YOUR MAGIC WAND CLICK INSIDE OF FRAME. SELECTIONS, MODIFY BY4, C/P PAPER2, SELECTIONS, INVERT, HIT DELETE. SELECTIONS-SELECT NONE. 

C/P TUBE OF CHOICE, PLACE TO THE RIGHT OF THE FRAME.

COPY AND PASTE ELEMENTS OF CHOICE OR THE ONES I HAVE USED

ELEMENT34 RESIZE85% OVER THE EDGE OF THE FRAME

ELEMENT19 RESIZE90% PLACE IN THE MIDDLE OF THE FRAME MOVE UNDER THE FRAME LAYER IN THE LAYERS PALETTE, ERASE ANY PART OF THE WEB THAT IS OUTSIDE OF THE FRAME

ELEMENT45 PLACE AT THE TOP OF THE FRAME IN THE MIDDLE

ELEMENT72 RESIZE55% PLACE TO THE RIGHT OF THE FRAME, MOVE UNDER YOUR TUBE LAYER IN YOUR LAYERS PALETTE

ELEMENT23 RESIZE65% PLACE TO THE LEFT

ELEMENT14 RESIZE65% PLACE TO THE LEFT OF ELEMENT23

ELEMENT20 RESIZE45% PLACE TO THE RIGHT OF ELEMENT23

ELEMENT38 RESIZE65% PLACE TO THE LEFT OF ELEMENT20

 ELEMENT75 RESIZE45% PLACE ON THE LEFT OF ELEMENT38

ELEMENT10 RESIZE90% PLACE THE END ON THE LEFT SIDE

ELEMENT76 RESIZE55% PLACE TO THE RIGHT OF ELEMENT20, MOVE UNDER YOUR TUBE IN YOUR LAYERS PALETTE

ELEMENT65 RESIZE85%, MIRROR, MOVE DOWN A BIT

ELEMENT45 RESIZE55% MOVE TO THE LEFT, SEND TO BOTTOM, DUPLICATE, MIRROR


CROP MERGED OPAQUE. MERGE VISIBLE. RESIZE TO DESIRED SIZE.

ADD PROPER COPYRIGHT AND NAME OR SAYING OF CHOICE. SAVE AS .PNG

THANK YOU FOR TRYING MY TUTORIAL. I HOPE YOU HAVE ENJOYED IT.

THIS TUTORIAL WAS WRITTEN ON OCTOBER 23, 2012


Friday, October 19, 2012

Pink Witch


THIS TUTORIAL IS WRITTEN FOR THOSE WHO HAVE A WORKING KNOWLEDGE OF PSP.

I USE PSP9, BUT ANY VERSION SHOULD WORK.


ALL OF MY TUTORIALS ARE OF MY OWN CREATIONS. ANY SIMILARITY WITH ANY OTHER TUTORIALS IS PURELY COINCIDENTAL.

I AM ALWAYS INTERESTED IN WHAT YOU MAKE USING MY TUTORIALS, YOU MAY SEND YOUR RESULTS TO ME AT MISTYLYNN1009@AOL.COM AND I WILL SHOW THEM OFF.

SUPPLIES NEEDED:
TUBE OF CHOICE.
I AM USING ARTWORK BY UCHAKINA. A PTU ARTIST YOU MUST PURCHASE AND OBTAIN A LICENSE TO USE. WHICH YOU CAN GET AT HERE.


SCRAPKIT OF CHOICE.
I AM USING A PTU KIT BY PINKCANDY DESIGNS CALLED PINK WITCH WHICH YOU CAN GET HERE

MASK OF CHOICE.
I AM USING WSL3 WHICH YOU CAN GET HERE


DON'T FORGET TO SAVE OFTEN!


WHEN YOU SEE C/P THAT MEANS COPY AND PASTE

INSTRUCTIONS FOR COPING AND PASTING
ACTIVATE THE LAYER, SELECTIONS-SELECT ALL-SELECTIONS-FLOAT-SELECTIONS-DEFLOAT, CLICK ON THE ITEM YOU WANT TO PASTE, COPY IT BACK TO WHERE ARE WORKING AND PASTE. SELECTIONS-INVERT AND HIT DELETE. SELECT NONE. THAT IS USED MAINLY FOR COPYING PAPERS AND TUBES INTO FRAMES. OTHER WISE YOU JUST COPY AND PASTE.


LETS GET STARTED!!
OPEN A NEW IMAGE 700X700


C/P FILMSTRIP, RESIZE95%, USING YOUR MAGIC WAND CLICK INSIDE OF EACH SQUARE HOLDING DOWN THE SHIFT KEY. SELECTIONS, MODIFY BY2, C/P PAPER12, SELECTIONS, INVERT, HIT DELETE. SELECTIONS-SELECT NONE. 

C/P TUBE OF CHOICE, CENTER ON THE FRAME.

COPY AND PASTE ELEMENTS OF CHOICE OR THE ONES I HAVE USED

BOOKS RESIZE60% PLACE AT THE BOTTOM ON THE RIGHT SIDE

CANDLE2 RESIZE45% PLACE ON THE LEFT SIDE OF THE FRAME AT THE TOP

CAT RESIZE55% PLACE ON THE LEFT OF THE BOOKS

GLITTER SEND TO BOTTOM

DECOR RESIZE75% PLACE TO THE RIGHT

BAT RESIZE75% ROTATE LEFT 15 DEGREES PLACE AT THE TOP TO THE LEFT OF THE DECOR

CAULDRON RESIZE60% PLACE AT THE BOTTOM OVER THE SECOND SQUARE OF THE FRAME

CUPCAKE2 RESIZE50% PLACE TO THE RIGHT OF THE CAULDRON. I ADDED A THIN GRADIENT GLOW USING EYE CANDY4 AND THIS COLOR #f26eed PLUS A DROP SHADOW TO HELP BRING OUT THE CUPCAKE

 SPIDERWED RESIZE50% PLACE INSIDE THE FIRST SQUARE OF THE FRAME, ARRANGE UNDER THE FRAME LAYER IN THE LAYERS PALETTE, ERASE ANY PART SHOWING OUTSIDE OF THE FRAME

PUMPKIN2 RESIZE50% PLACE TO THE LEFT OF THE CAULDRON

SPIDER RESIZE40% PLACE IN THE DECOR

C/P PAPER3, APPLY MASK, MERGE GROUP, SEND TO BOTTOM

CROP MERGED OPAQUE. MERGE VISIBLE. RESIZE TO DESIRED SIZE.

ADD PROPER COPYRIGHT AND NAME OR SAYING OF CHOICE. SAVE AS .PNG

THANK YOU FOR TRYING MY TUTORIAL. I HOPE YOU HAVE ENJOYED IT.

THIS TUTORIAL WAS WRITTEN ON OCTOBER 19, 2012


Hope


THIS TUTORIAL IS WRITTEN FOR THOSE WHO HAVE A WORKING KNOWLEDGE OF PSP.

I USE PSP9, BUT ANY VERSION SHOULD WORK.


ALL OF MY TUTORIALS ARE OF MY OWN CREATIONS. ANY SIMILARITY WITH ANY OTHER TUTORIALS IS PURELY COINCIDENTAL.

I AM ALWAYS INTERESTED IN WHAT YOU MAKE USING MY TUTORIALS, YOU MAY SEND YOUR RESULTS TO ME AT MISTYLYNN1009@AOL.COM AND I WILL SHOW THEM OFF.

SUPPLIES NEEDED:
TUBE OF CHOICE.
I AM USING ARTWORK BY JOSE CANO. A PTU ARTIST YOU MUST PURCHASE AND OBTAIN A LICENSE TO USE. WHICH YOU CAN GET AT SATC HERE.


SCRAPKIT OF CHOICE.
I AM USING A PTU KIT BY BIBI'S COLLECTIONS CALLED PINK HOPE WHICH YOU CAN GET HERE


DON'T FORGET TO SAVE OFTEN!


WHEN YOU SEE C/P THAT MEANS COPY AND PASTE

INSTRUCTIONS FOR COPING AND PASTING
ACTIVATE THE LAYER, SELECTIONS-SELECT ALL-SELECTIONS-FLOAT-SELECTIONS-DEFLOAT, CLICK ON THE ITEM YOU WANT TO PASTE, COPY IT BACK TO WHERE ARE WORKING AND PASTE. SELECTIONS-INVERT AND HIT DELETE. SELECT NONE. THAT IS USED MAINLY FOR COPYING PAPERS AND TUBES INTO FRAMES. OTHER WISE YOU JUST COPY AND PASTE.


LETS GET STARTED!!
OPEN A NEW IMAGE 700X700


C/P ELEMENT29, RESIZE85%, USING YOUR MAGIC WAND CLICK INSIDE OF THE FRAME. SELECTIONS, MODIFY BY5, C/P PAPER1, SELECTIONS, INVERT, HIT DELETE. C/P CLOSE UP OF TUBE, DUPLICATE TUBE. CLOSE DUPLICATE TUBE. CLICK ON ORIGINAL TUBE, HIT DELETE. SELECT NONE. CLICK ON DUPLICATE TUBE, OPEN IT AND SEND TO TOP. ERASE PART OF TUBE YOU DON'T WANT SHOWING OUTSIDE OF THE FRAME.

COPY AND PASTE ELEMENTS OF CHOICE OR THE ONES I HAVE USED

ELEMENT21 PLACE AT THE TOP ON THE LEFT SIDE, SEND TO BOTTOM. DUPLICATE 5 TIMES AND ARRANGE AROUND YOUR FRAME

ELEMENT61 PLACE AT THE TOP ON THE LEFT SIDE OF THE FRAME

ELEMENT62 PLACE AT THE TOP ON THE LEFT SIDE OF THE FRAME UNDER ELEMENT61

ELEMENT60 RESIZE75% PLACE AT THE BOTTOM ON THE RIGHT SIDE

ELEMENT10 PLACE ON THE TOP RIGHT CORNER OF ELEMENT60, DUPLICATE AND MOVE UP ON THE FRAME A BIT

ELEMENT11 RESIZE85% PLACE TO THE LEFT OF ELEMENT60

ELEMENT37 RESIZE50% PLACE TO THE LEFT OF ELEMENT11

ELEMENT24 RESIZE65% PLACE TO THE LEFT OF ELEMENT37, ARRANGE UNDER ELEMENT37 AND ELEMENT11 IN YOUR LAYERS PALETTE

ELEMENT73 RESIZE85% PLACE TO THE LEFT OF ELEMENT24 ARRANGE UNDER ELEMENT34 IN YOUR LAYERS PALETTE

ELEMENT23 RESIZE85% PLACE IN THE MIDDLE OF THE TAG AND DOWN A BIT

CROP MERGED OPAQUE. MERGE VISIBLE. RESIZE TO DESIRED SIZE.


ADD PROPER COPYRIGHT AND NAME OR SAYING OF CHOICE. SAVE AS .PNG

THANK YOU FOR TRYING MY TUTORIAL. I HOPE YOU HAVE ENJOYED IT.

THIS TUTORIAL WAS WRITTEN ON OCTOBER 19, 2012


Wednesday, October 17, 2012

Colorful Halloween


THIS TUTORIAL IS WRITTEN FOR THOSE WHO HAVE A WORKING KNOWLEDGE OF PSP.

I USE PSP9, BUT ANY VERSION SHOULD WORK.


ALL OF MY TUTORIALS ARE OF MY OWN CREATIONS. ANY SIMILARITY WITH ANY OTHER TUTORIALS IS PURELY COINCIDENTAL.


I AM ALWAYS INTERESTED IN WHAT YOU MAKE USING MY TUTORIALS, YOU MAY SEND YOUR RESULTS TO ME AT MISTYLYNN1009@AOL.COM AND I WILL SHOW THEM OFF.

SUPPLIES NEEDED:

SCRAPKIT OF CHOICE.
I AM USING A PTU KIT BY  PURPLES KREATIONZ CALLED THE BOO CREW WHICH IS PART OF A COLLAB THAT YOU CAN GET FREE WHEN YOU SPEND $5.00 AT THE STORE, WHICH YOU CAN GET HERE


DON'T FORGET TO SAVE OFTEN!

WHEN YOU SEE C/P THAT MEANS COPY AND PASTE

INSTRUCTIONS FOR COPING AND PASTING
ACTIVATE THE LAYER, SELECTIONS-SELECT ALL-SELECTIONS-FLOAT-SELECTIONS-DEFLOAT, CLICK ON THE ITEM YOU WANT TO PASTE, COPY IT BACK TO WHERE ARE WORKING AND PASTE. SELECTIONS-INVERT AND HIT DELETE. SELECT NONE. THAT IS USED MAINLY FOR COPYING PAPERS AND TUBES INTO FRAMES. OTHER WISE YOU JUST COPY AND PASTE.


LETS GET STARTED!!


OPEN A NEW IMAGE 600X250


 C/P PAPER2 CROP TO SIZE


HAUNTED HOUSE RESIZE50% PLACE IN MIDDLE
GHOST KID RESIZE55% PLACE TO THE LEFT OF THE HAUNTED HOUSE
TRICK OR TREATER RESIZE55% PLACE TO THE LEFT OF THE GHOST KID
SKELLY CAT RESIZE40% PLACE IN THE MIDDLE OF GHOST KID AND TRICK OR TREATER
WEB2 RESIZE40% PLACE IN THE UPPER LEFT HAND CORNER
EYEBALL TREE RESIZE40% PLACE ON THE RIGHT EDGE OF THE WEB
COFFIN RESIZE40% MIRROR PLACE IN THE LOWER LEFT CORNER
CAULDRON RESIZE40% PLACE TO THE RIGHT OF THE COFFIN
CLICK ON TOP LAYER. C/P PAPER17, SELECTIONS-SELECT ALL-CONTRACT BY 7, HIT DELETE. SELECT NONE.
ADD DROP SHADOWD ON ALL LAYERS.
SHIFT D TO COPY TAG, CROP WIDTH 150 HEIGHT 150 AND MOVE TO DESIRED AREA TO MAKE YOUR AVATAR.


CROP MERGED OPAQUE. MERGE VISIBLE.


ADD PROPER COPYRIGHT AND NAME OR SAYING OF CHOICE. SAVE AS .PNG

THANK YOU FOR TRYING MY TUTORIAL. I HOPE YOU HAVE ENJOYED IT.

THIS TUTORIAL WAS WRITTEN ON OCTOBER 17, 2012


Saturday, October 13, 2012

Mz Freddy


THIS TUTORIAL IS WRITTEN FOR THOSE WHO HAVE A WORKING KNOWLEDGE OF PSP.

I USE PSP9, BUT ANY VERSION SHOULD WORK.


ALL OF MY TUTORIALS ARE OF MY OWN CREATIONS. ANY SIMILARITY WITH ANY OTHER TUTORIALS IS PURELY COINCIDENTAL.


I AM ALWAYS INTERESTED IN WHAT YOU MAKE USING MY TUTORIALS, YOU MAY SEND YOUR RESULTS TO ME AT MISTYLYNN1009@AOL.COM AND I WILL SHOW THEM OFF.

SUPPLIES NEEDED:
TUBE AND CLOSE UP OF CHOICE.
I AM USING ARTWORK BY SPAZZ. A PTU ARTIST YOU MUST PURCHASE AND OBTAIN A LICENSE TO USE. WHICH YOU CAN GET SATC HERE.


SCRAPKIT OF CHOICE.
I AM USING A PTU KIT BY BLACK WIDOW CREATIONZ  CALLED LIGHTERS WHICH YOU CAN GET SATC HERE


DON'T FORGET TO SAVE OFTEN!

WHEN YOU SEE C/P THAT MEANS COPY AND PASTE

INSTRUCTIONS FOR COPING AND PASTING
ACTIVATE THE LAYER, SELECTIONS-SELECT ALL-SELECTIONS-FLOAT-SELECTIONS-DEFLOAT, CLICK ON THE ITEM YOU WANT TO PASTE, COPY IT BACK TO WHERE ARE WORKING AND PASTE. SELECTIONS-INVERT AND HIT DELETE. SELECT NONE. THAT IS USED MAINLY FOR COPYING PAPERS AND TUBES INTO FRAMES. OTHER WISE YOU JUST COPY AND PASTE.


LETS GET STARTED!!


OPEN A NEW IMAGE 700X700

C/P ELEMENT41, CENTER

COPY AND PASTE ELEMENTS OF CHOICE OR THE ONES I HAVE USED

ELEMENT47 RESIZE90%
USING YOUR MAGIC WAND CLICK INSIDE OF THE FRAME. SELECTIONS, MODIFY BY5, C/P CLOSE UP OF TUBE, INVERT, DELETE. SELECT NONE, MOVE TUBE LAYER UNDER THE FRAME LAYER. CLICK ON THE TOP LAYER. C/P CLOSE UP OF TUBE AGAIN, ERASE THE PART YOU DON'T WANT SHOWING OUTSIDE OF THE FRAME.

ELEMENT43, FLIP, MOVE TO THE BOTTOM

ELEMENT42 RESIZE65%, ROTATE 15 DEGREES, PLACE ON THE LEFT SIDE OF THE FRAME

ELEMENT11 RESIZE50% PLACE AT THE BOTTOM ON THE LEFT SIDE 

ELEMENT29 RESIZE50%,PLACE ON THE LEFT SIDE

C/P TUBE PLACE ON THE RIGHT SIDE AND PLACE ON THE RIBBON  LIKE SHE IS SITTING ON IT


CROP MERGED OPAQUE. MERGE VISIBLE. RESIZE TO DESIRED SIZE.


ADD PROPER COPYRIGHT AND NAME OR SAYING OF CHOICE. SAVE AS .PNG


THANK YOU FOR TRYING MY TUTORIAL. I HOPE YOU HAVE ENJOYED IT.


THIS TUTORIAL WAS WRITTEN ON OCTOBER 13, 2012


Monday, October 1, 2012

Happy Witch


THIS TUTORIAL IS WRITTEN FOR THOSE WHO HAVE A WORKING KNOWLEDGE OF PSP.

I USE PSP9, BUT ANY VERSION SHOULD WORK.


ALL OF MY TUTORIALS ARE OF MY OWN CREATIONS. ANY SIMILARITY WITH ANY OTHER TUTORIALS IS PURELY COINCIDENTAL.


I AM ALWAYS INTERESTED IN WHAT YOU MAKE USING MY TUTORIALS, YOU MAY SEND YOUR RESULTS TO ME AT MISTYLYNN1009@AOL.COM AND I WILL SHOW THEM OFF.

SUPPLIES NEEDED:

TUBE OF CHOICE.
I AM USING ARTWORK BY ISMAEL RAC. A PTU ARTIST YOU MUST PURCHASE AND OBTAIN A LICENSE TO USE. WHICH YOU CAN GET HERE.


SCRAPKIT OF CHOICE.
I AM USING A PTU KIT BY SCRAPPER'S GONE BAD CALLED DARK MOOD WHICH YOU CAN GET HERE


DON'T FORGET TO SAVE OFTEN!

WHEN YOU SEE C/P THAT MEANS COPY AND PASTE

INSTRUCTIONS FOR COPING AND PASTING
ACTIVATE THE LAYER, SELECTIONS-SELECT ALL-SELECTIONS-FLOAT-SELECTIONS-DEFLOAT, CLICK ON THE ITEM YOU WANT TO PASTE, COPY IT BACK TO WHERE ARE WORKING AND PASTE. SELECTIONS-INVERT AND HIT DELETE. SELECT NONE. THAT IS USED MAINLY FOR COPYING PAPERS AND TUBES INTO FRAMES. OTHER WISE YOU JUST COPY AND PASTE.


LETS GET STARTED!!


OPEN A NEW IMAGE 700X700
C/P ELEMENT19, USING YOUR MAGIC WAND CLICK INSIDE OF THE FRAME. SELECTIONS, MODIFY BY5, C/P PAPER5, SELECTIONS, INVERT, HIT DELETE. SELECT NONE.
C/P TUBE PLACE IN MIDDLE OF THE FRAME

COPY AND PASTE ELEMENTS OF CHOICE OR THE ONES I HAVE USED

ELEMENT43 RESIZE75% PLACE IN THE TOP LEFT CORNER OF THE FRAME, ERASE ANY PART OF IT SHOWING OUTSIDE OF THE FRAME
ELEMENT36 RESIZE50% PLACE AT THE BOTTOM ON THE RIGHT SIDE
ELEMENT47 RESIZE45% PLACE AT THE BOTTOM ON THE RIGHT SIDE ARRANGE UNDER ELEMENT36
ELEMENT53 RESIZE55% PLACE AT THE BOTTOM ON THE RIGHT SIDE ARRANGE UNDER ELEMENT36
ELEMENT55 RESIZE55%, MIRROR, PLACE AT THE TOP ON THE LEFT SIDE
ELEMENT67 MOVE TO THE RIGHT SO THAT PART OF IT IS SHOWING FROM BEHIND YOUR FRAME, SEND TO BOTTOM, DUPLICATE, MIRROR
ELEMENT66 LEAVE IN CENTER
CROP MERGED OPAQUE. MERGE VISIBLE. RESIZE TO DESIRED SIZE.


ADD PROPER COPYRIGHT AND NAME OR SAYING OF CHOICE. SAVE AS .PNG

THANK YOU FOR TRYING MY TUTORIAL. I HOPE YOU HAVE ENJOYED IT.

THIS TUTORIAL WAS WRITTEN ON SEPTEMBER 30, 2012