Monday, July 7, 2014

USA Babe

 
This tutorial was written for those who have a working knowledge of psp.
I use paint shop 9, but any version should work.

All of my tutorials are of my own creations any similarity with any other tutorial is purely coincidental.Please do not copy my tutorials please link back to my blog!

I am always interested in seeing what you create using my tuts. You can send your results to me at lynnkitten101@gmail.com


SUPPLIES NEEDED:

Tube of choice.
I am using artwork by The Hunter
A PTU Artist. You must purchase and obtain a license to use
   Which you can get here.

Scrapkit of Choice:
Scrapkit PTU Americana Collab by Bibis Collection which you can get here

Font of choice. 

Template of choice:
I used Template59 by Millies 
Psp Madness which you can get here
 
Filters needed:
eye candy4-gradient glow


Don't forget to save often!


LET'S GET STARTED

Open template, shift D to duplicate, close original. Delete credits, layer 14-17,  and background
 
 
Instructions for coping and pasting. 
Activate the layer. 
Selections-select all-float-defloat-selections-invert, active paper or tube layer and hit delete. 


When you see C/P in the tut that means Copy and Paste.
Add drop shadow as desired. See my tag for exact placement.
Copy and paste desired papers into each layer.  Then delete the original layers.


I used paper3 for layer2,3 and 1
 
paper5 for layer4

  paper8 for layer5
 
for remaining layers flood fill with white or red and add dsb flux bright noise. add close up tube to the 2 squares.


  C/P elements of choice or use mine below. See my tag for exact placement.
 
c/p your tube center
 
c/p the following elements from left to right, resize to your liking. 
 
element70
element27
element57
element54
element56
element86
element123
element103
element118
element109
element15
element97
Merge visible


Add name or saying of choice

Add proper copyright info and save as .png

Thanks for trying my tutorial. I hope you enjoyed it.

This tutorial was written on July 6, 2014
 photo tutblog1_zps6f1c5424.png

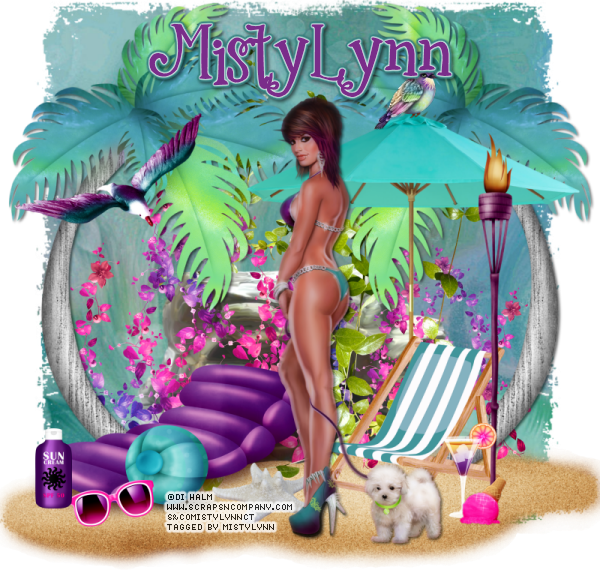
Summer2


This tutorial was written for those who have a working knowledge of psp.

I use paint shop 9, but any version should work.


All of my tutorials are of my own creations any similarity with any other tutorial is purely coincidental.Please do not copy my tutorials please link back to my blog!


I am always interested in seeing what you create using my tuts. You can send your results to me at lynnkitten101@gmail.com


SUPPLIES NEEDED:


Tube of choice.
I am using artwork by Di Halim
A PTU Artist. You must purchase and obtain a license to use
 You can get this tube here.
 
Scrapkit of Choice:
Scrapkit PTU Whimsical Summer by Bibis Collection.
  You can find this kit here
 
Mask of Choice:
I used WSL Mask_345 which you can get here
 
Font of choice.


Filters needed:
eye candy4-gradient glow-used for name


Don't forget to save often!


LET'S GET STARTED


Open a new image 800x800
 
  c/p paper2 apply mask, merge group

element86 resize place at the bottom

c/p your tube place on the sand

PLACE THESE ELEMENTS

element94
element8
element28
element79
element72
element1
element44
element45
element115
element109
element75
element25
element43
element24
element101


Add name or saying of choice

Add proper copyright info and save as .png

Thanks for trying my tutorial. I hope you enjoyed it.

This tutorial was written on July 3, 2014
 photo tutblog1_zps6f1c5424.png

Wednesday, July 2, 2014

Diana

 
This tutorial was written for those who have a working knowledge of psp.
I use paint shop 9, but any version should work.

All of my tutorials are of my own creations any similarity with any other tutorial is purely coincidental.Please do not copy my tutorials please link back to my blog!

I am always interested in seeing what you create using my tuts. You can send your results to me at lynnkitten101@gmail.com


SUPPLIES NEEDED:

Tube of choice.
I am using artwork by Lady Miska
A PTU Artist. You must purchase and obtain a license to use
   Which you can get here.

Scrapkit of Choice:
Scrapkit FTU Hearts and Flowers by Kittz Kreationz which you can get here

Font of choice. 


Filters needed:
eye candy4-gradient glow


Don't forget to save often!


LET'S GET STARTED

Open template, shift D to duplicate, close original. Delete by credits, wordart by kristin, pixel wordart, dotted lines and background
 
 
Instructions for coping and pasting. 
Activate the layer. 
Selections-select all-float-defloat-selections-invert, active paper or tube layer and hit delete. 


When you see C/P in the tut that means Copy and Paste.
Add drop shadow as desired. See my tag for exact placement.
C/P HF4 click inside with the magic wand. Selections, modify, expand by 5, c/p paper3, selections, invert, hit delete. C/P tube, duplicate. Close the duplicate, click on the original, hit delete. Select none. Move paper and tube under the frame layer. Open the duplicate, bring to top. Erase any part you don't want showing outside the frame.

  C/P elements of choice or use mine below. See my tag for exact placement.
 

c/p the following elements from left to right, resize to your liking. 
 
HF41
HF1
HF5
  HF8
  HF10
HF27
HF18
HF17
   
Merge visible

Add name or saying of choice

Add proper copyright info and save as .png

Thanks for trying my tutorial. I hope you enjoyed it.

This tutorial was written on July 2, 2014
 photo tutblog1_zps6f1c5424.png

Tuesday, July 1, 2014

Muzik Lover


This tutorial was written for those who have a working knowledge of psp.
I use paint shop 9, but any version should work.

All of my tutorials are of my own creations any similarity with any other tutorial is purely coincidental.Please do not copy my tutorials please link back to my blog!

I am always interested in seeing what you create using my tuts. You can send your results to me at lynnkitten101@gmail.com


SUPPLIES NEEDED:

Tube of choice.
I am using artwork by Elias Chatzoudis
A PTU Artist. You must purchase and obtain a license to use
   Which you can get here.

Scrapkit of Choice:
Scrapkit PTU Muzik Luvr by Toxic Desirez which you can get here

Font of choice. 

Template of choice:
I used Kristin TagTemplate136 which you can get here
 
Filters needed:
eye candy4-gradient glow


Don't forget to save often!


LET'S GET STARTED

Open template, shift D to duplicate, close original. Delete credits, pixel words,  and background
 
 
Instructions for coping and pasting. 
Activate the layer. 
Selections-select all-float-defloat-selections-invert, active paper or tube layer and hit delete. 


When you see C/P in the tut that means Copy and Paste.
Add drop shadow as desired. See my tag for exact placement.
Copy and paste desired papers into each layer.  Then delete the original layers.


I used paper9 for teal circles
 
paper6 for pink circles

  paper7 for glittered circles
 
paper11 for pink circle


  C/P elements of choice or use mine below. See my tag for exact placement.
 
c/p your tube center
 
c/p the following elements from left to right, resize to your liking. 
 
frame1 place under your tube layer
pass
record
guitar1
mircrophone
cupcake
notes heart2
piano keys
candy2
skull1
speakers
cassette
headphones
splatter

Merge visible


Add name or saying of choice

Add proper copyright info and save as .png

Thanks for trying my tutorial. I hope you enjoyed it.

This tutorial was written on June 20, 2014
 photo tutblog1_zps6f1c5424.png

USA Swag


This tutorial was written for those who have a working knowledge of psp.
I use paint shop 9, but any version should work.

All of my tutorials are of my own creations any similarity with any other tutorial is purely coincidental.Please do not copy my tutorials please link back to my blog!

I am always interested in seeing what you create using my tuts. You can send your results to me at lynnkitten101@gmail.com


SUPPLIES NEEDED:

Tube of choice.
I am using artwork by The Hunter
A PTU Artist. You must purchase and obtain a license to use
   Which you can get here.

Scrapkit of Choice:
Scrapkit PTU USA Swag by Disturbed Scraps which you can get here

Font of choice. 

Template of choice:
I used Kristin TagTemplate130 which you can get here
 

Filters needed:
eye candy4-gradient glow


Don't forget to save often!


LET'S GET STARTED

Open template, shift D to duplicate, close original. Delete by credits, wordart by kristin, pixel wordart, dotted lines and background
 
 
Instructions for coping and pasting. 
Activate the layer. 
Selections-select all-float-defloat-selections-invert, active paper or tube layer and hit delete. 


When you see C/P in the tut that means Copy and Paste.
Add drop shadow as desired. See my tag for exact placement.
Copy and paste desired papers into each layer.  Then delete the original layers.


I used paper02 for pink rectangles


paper3 for teal rectangle

  paper13 for black circle
 
paper11 for pink circle

paper01 for teal circle


  C/P elements of choice or use mine below. See my tag for exact placement.
 
c/p your tube center
 
c/p the following elements from left to right, resize to your liking. 
 
element24
element31
element03
 element30
 element82
element32
element08
element78
  
Merge visible

Add name or saying of choice

Add proper copyright info and save as .png

Thanks for trying my tutorial. I hope you enjoyed it.

This tutorial was written on June 30, 2014
 photo tutblog1_zps6f1c5424.png